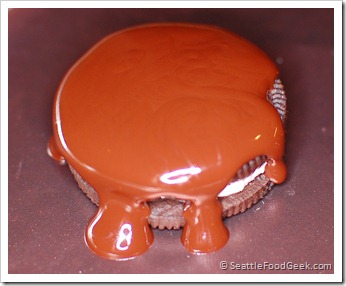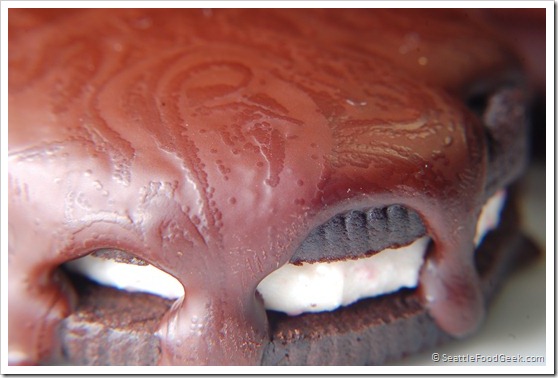
I’m not much of a chocolatier, but I’ve watched my dad temper chocolate and make truffles a dozen times or so. The transformation that takes place during the tempering process is fascinating, and it only becomes more curious with my first attempt to temper using sous vide. Notice the pattern of dark, shiny dots and lines? I didn’t put it there.
The process of tempering chocolate is all about forming the cocoa butter into a regular crystalline structure. This gives properly tempered chocolate its signature glossiness and brittle snap. I found these instructions on the tempering process and adapted them for sous vide. Here are the steps I took:
- I crushed 5.00oz of Scharffen Berger Unsweetened 99% Cacao Baking Chocolate and sealed it in a 12” square vacuum bag. The sealed chocolate was spread out in an even layer, about 1/4” thick. [BTW, unsweetened (even the good stuff) chocolate tastes like shit. I chose it because it was in the pantry.]
- I set my Sous Vide Professional (generously on loan from Polyscience) to 115F in a 4-gallon basin with about one gallon of water.
- I added the bagged chocolate and it began to melt instantly. I felt the bag for lumps, and within 3 minutes, all of the chocolate was melted and presumably at exactly 115F.
- I lowered the set temperature on the sous vide machine to 84F and added a few large ice cubes and short bursts of cold water until the temperature reached 84F. This process took about 7 minutes. I held the temperature at 84F for 2 minutes.
- Finally, I raised the set temperature to 88F. The bath took 1-2 minutes to heat to 88F and overshot the desired temperature by .5F (for a moment, the temperature of the water bath was 88.5F). I held the chocolate at 88F for 2 minutes.
I removed the bag and wiped it dry. Then, I cut off one of the corners leaving a small opening, perhaps 1/16th of an inch, so I could pipe out the liquid chocolate. I had a few Trader Joe’s Candy Cane Jo Jos (fake mint Oreos) lying around, so I covered them with the chocolate. While it was still molten, the chocolate looked great (see below).

I the chocolate cool for 30 minutes before getting impatient and popping my tray of cookies into the freezer. I let them freeze for about 10 minutes before removing them to take pictures (the surface temperate of the chocolate was 56F when I removed the cookies from the freezer). Strangely, during the cooling process, a bizarre pattern formed on the surface of the chocolate. It didn’t look properly tempered, as most of the chocolate was relatively dull and didn’t have much snap. However, the chocolate was covered with an intricate pattern of darker, shinier dots and lines that reminded me of Damascus steel.

Without knowing much about the molecular process of tempering (besides the very helpful information found here), my guess is that the dark areas represent places in the chocolate where beta crystals began to form. The lighter, duller areas may be places where, for whatever, reason, the crystallization never quite took off.
In every other method I’ve seen for tempering chocolate, the chocolate is stirred or circulated. I couldn’t tell if the motion of the chocolate was purely to promote an even temperature, or if was critical for forming the crystalline structure of properly-tempered chocolate. Since I was using a precisely temperature-controlled bath to heat my chocolate, I didn’t have to worry about circulating it to even out the temperature. However, perhaps circulation really is key to an even temper.
If there are any tempering experts out there, I’d love to hear your thoughts on this mysterious pattern!

When you temper chocolate, doesn’t a “seed” of already properly tempered chocolate promote the proper crystallization?
I’ve read Greuwling’s book and I think the big thing the seed does is to agitate the chocolate, which is the same as tabling your chocolate on marble. I think the main effect is on crystal formation in the cocoa butter.
You are correct, one must KNEAD the chocolate at each temperature and hold it there..knead it again.
This will assure complete dstribution of the seed crystal. Also, different temperatures help to form different (larger or smaller) crystals. You want SMALL crystals, that is why you want the set to happen at around 86 degrees and why you raise the temp back up to 90 and hold before using.
FWIW, Jeff Potter’s _Cooking for Geeks_ recommends a steady-state temperature of 91-92 deg F when starting with already-tempered chocolate. Haven’t yet tried it myself though.
Check out this web site, from a chocolatier:
http://mehditruffles.blogspot.com/2011/02/sous-vide-tempering-is-whats-next-in.html
I’m new to chocolate and tempering, so forgive me if this is ridiculous: Isn’t it the slow cooling that lets the crystals form properly? By putting them in the freezer you might have stopped that process, no matter how well the tempering was done (as far as temperature is concerned).
I think Robert is onto something here.
The freezing would probably accelerate the crystal formation in a manner that would cause it to crystalize faster at the surface than internally. Perhaps creating a low convection in the chocolate, resulting in the pattern.
For best results you need to temper chocolate the normal way but it can be stored in the bowl at 90 degrees once tempered, the whole process of mixing tempered chocolate into the the melted chocolate is necessary, The tempered chocolate tells the melted chocolate what it is supposed to look like it terms of crystal formation. Once it has crystallized you can keep the tempered chocolate in your water bath for however long you want.
Alternatively; one method i am going to try soon is to put the chocolate in the water bath at 82F (to avoid disturbing the crystal formation in the chocolate), once it is evenly heated I will increase it to 90F to make the chocolate workable. This process would be done in a vacuum sealed bag.
If all chocolate needs a “seed” of tempered chocolate to temper. Where did the first “seed” come from? You dont need to seed it. More than likely you gor that result because of the quality or age of the clocolate. Yes stirring or kneeding the chocolate is needed for that perfect temper, but i do not remember why that is.
I think it’s obvious what’s happened. Freezing has pushed the choc into the State I crystal (dull) and not the higher-temperature Phase V (tempered chocolate). Solution: don’t use the freezer, but allow to cool at room temperature.
Till now, I thought only meat could be cooked with sous vide machine, But your article gave me a clear information about making tampering chocolate. I’m going to try this recipe in my machine and serve it to my kids.
Your linked website is about sous vide
Out of curiosity, what sous vide machine do you use?
Disclaimer: not a chocolate expert. Think of crystallizing sugar in rock candy or a honey jar, or ice in a freezer. To get a single clear “grain” or crystal, you need to control the rate and direction of cooling and ideally start from one seed grain (depending on your objective), or after multiple grains have already formed, heat up to a point where the grains can merge and the crystalline structure of separate molecules can realign with each other. Agitation, stirring, squeezing, mixing helps speed up the process of realignment of the molecules since chocolate is more viscous than water or syrup. Agitation will help reduce the amount of time required temperature to allow the grain to form or grow. That being said, I am sure that the phase diagram varies significantly and number of phases possible vary depending on the ingredients in the chocolate, e.g. fat types, wax content, etc.
I’ve read that the more it’s agitated, the nice-n-shinier it’ll be.
Looking at the close up picture, it made me think that some moisture got to the chocolate. When I read the part about putting it in the freezer I went “Ah Ha!” there it is. To keep the freezer “frost free” it has cycle of blowing warm air into the freezer on and off. This keep the frost from forming, but the warm air causes condensation which = moist air.
I hope you tried it again without putting it in the fridge. Never put chocolate you’re tempering in the fridge or freezer.
Pingback: The Food Lab: The Best Way to Temper Chocolate – My WordPress Website
W88 Dealer offers Football Betting, Online Casino, KENO, Fish Shooting Game. Free 100% promotion, cash withdrawal in 10 minutes.
Read Kenji-Lopez’s article on sous vide tempering and follow his instructions. I have done it his way a number of times and it works beautifully. It is also the best way not to waste chcolate as any chocolate that you do not use can be saved and used again — just re-seal the bag and re-temper.
Also, if you are using high quality chocolate, it comes with the correct temperatures for tempering that particular chocolate. Use them to get the correct melting temperature, the lowest temp and then the temperature for when the crystallization is taking place — and that is the time when you squeeze the bag to mix the melted chocolate.